Integrating AAF with AIS Kubernetes XNAT Deployment
Applying for AAF Integration ClientId and Secret
AAF have several services they offer which authenticate users, for example, Rapid Connect. We are interested in the AAF OIDC RP service. Please contact AAF Support via email at support@aaf.net.au to apply for a ClientId and Secret.
They will ask you these questions:
- The service’s redirect URL - a redirect URL based on an actual URL rather than IP address and must use HTTPS.
- A descriptive name for the service.
- The organisation name, which must be an AAF subscriber, of the service.
- Indicate the service’s purpose - development/testing/production-ready.
- Your Keybase account id to share the credentials securely.
For 1. This is extremely important and based on two options in the openid-provider.properties file:
siteUrlpreEstablishedRedirUri
We will use this example below (this is the correct syntax):
openid-provider.properties
siteUrl=https://xnat.example.com
preEstablishedRedirUri=/openid-login
In this case, the answer to 1 should be https://xnat.example.com/openid-login Submitting https://xnat.example.com will lead to a non functional AAF setup.
- Can be anything – preferably descriptive.
- Exactly what it says. Mostly the university name depending on organisation
- This is important as it will dictate the AAF Servers your service will authenticate against.
If it is a testing or development environment, you will use the following details:
openid.aaf.accessTokenUri=https://central.test.aaf.edu.au/providers/op/token
openid.aaf.userAuthUri=https://central.test.aaf.edu.au/providers/op/authorize
For production environments (notice no test in the URLs):
openid.aaf.accessTokenUri=https://central.aaf.edu.au/providers/op/token
openid.aaf.userAuthUri=https://central.aaf.edu.au/providers/op/authorize
For 5. Just go to https://keybase.io/ and create an account to provide to AAF support so you can receive the ClientId and ClientSecret securely.
Installing the AAF Plugin in a working XNAT environment
There have been long standing issues with the QCIF plugin that have been resolved by the AIS Deployment team – namely unable to access any projects – see image below.
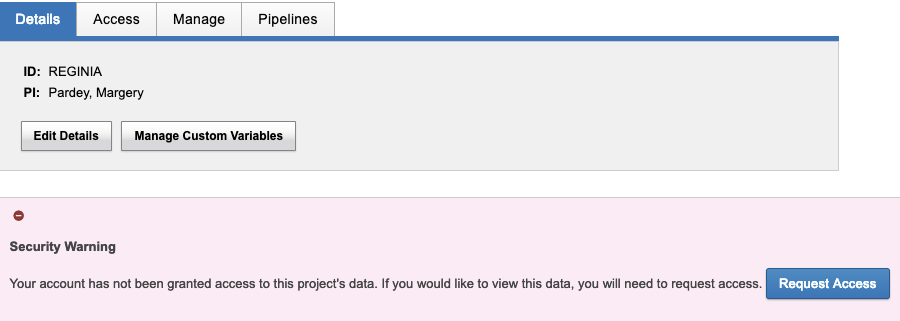
This issue occurred regardless of project access permissions. You would receive this error message trying to access your own project!
AIS Deployment team created a forked version of the plugin which fixes this issue. You can view it here:
https://github.com/Australian-Imaging-Service/xnat-openid-auth-plugin
To deploy to XNAT, navigate to the XNAT home/ plugins folder on your XNAT Application Server – normally /data/xnat/home/plugins and then download. Assuming Linux:
wget https://github.com/Australian-Imaging-Service/xnat-openid-auth-plugin/releases/download/1.0.2/xnat-openid-auth-plugin-all-1.0.2.jar
Please note this was the latest version at the time of writing this document. Please check here to see if there have been updated versions:
https://github.com/Australian-Imaging-Service/xnat-openid-auth-plugin/releases
You now have xnat-openid-auth-plugin-all-1.0.2.jar in /data/xnat/home/plugins.
You now need the configuration file which will be (assuming previous location for XNAT Home directory):
/data/xnat/home/config/auth/openid-provider.properties
You will need to create this file.
Review this sample file and tailor to your needs:
I will provide an example filled out properties file with some caveats below.
Warning
All of the keys are case sensitive, incorrectly capitalised entries will result in non-working AAF integration!These need to be left as is
auth.method=openid
type=openid
provider.id=openid
visible=true
Set these values to false if you want an Admin to enable and verify the account before users are allowed to login - recommended
auto.enabled=false
auto.verified=false
Name displayed in the UI – not particularly important
name=OpenID Authentication Provider
Toggle username & password login visibility
disableUsernamePasswordLogin=false
List of providers that appear on the login page, see options below. In our case we only need aaf but you can have any openid enabled provider
enabled=aaf
Site URL - the main domain, needed to build the pre-established URL below. See notes at top of document
siteUrl=https://xnat.example.com
preEstablishedRedirUri=/openid-login
AAF ClientID and Secret – CASE SENSITIVE - openid.aaf.clientID for example would mean AAF plugin will not function These are fake details but an example – no “ (quotation marks) required.
openid.aaf.clientId=123jsdjd
openid.aaf.clientSecret=chahdkdfdhffkhf
The providers are covered at the top of the document
openid.aaf.accessTokenUri=https://central.test.aaf.edu.au/providers/op/token
openid.aaf.userAuthUri=https://central.test.aaf.edu.au/providers/op/authorize
You can find more details on the remaining values here:
https://github.com/Australian-Imaging-Service/xnat-openid-auth-plugin
openid.aaf.scopes=openid,profile,email
If the below is wrong the AAF logo will not appear on the login page and you won’t be able to login
openid.aaf.link=<p>To sign-in using your AAF credentials, please click on the button below.</p><p><a href="/openid-login?providerId=aaf"><img src="/images/aaf_service_223x54.png" /></a></p>
Flag that sets if we should be checking email domains
openid.aaf.shouldFilterEmailDomains=false
Domains below are allowed to login, only checked when shouldFilterEmailDomains is true
openid.aaf.allowedEmailDomains=example.com
Flag to force the user creation process, normally this should be set to true
openid.aaf.forceUserCreate=true
Flag to set the enabled property of new users, set to false to allow admins to manually enable users before allowing logins, set to true to allow access right away
openid.aaf.userAutoEnabled=false
Flag to set the verified property of new users – use in conjunction with auto.verified
openid.aaf.userAutoVerified=false
Property names to use when creating users
openid.aaf.emailProperty=email
openid.aaf.givenNameProperty=given_name
openid.aaf.familyNameProperty=family_name
If you create your openid-provider.properties file with the above information, tailored to your environment, along with the plugin:/data/xnat/home/plugins/xnat-openid-auth-plugin-all-1.0.2.jar
You should only need to restart Tomcat to enable login. This assumes you have a valid AAF organisation login.
Using AAF with the AIS Kubernetes Chart Deployment
The AIS Charts Helm template has all you need to setup a completely functional XNAT implementation in minutes, part of this is AAF integration.
Prerequisites:
• A functional HTTPS URL with valid SSL certificate for your Kubernetes cluster. See the top of this document for details to provide to AAF.
• A ClientId and Secret provided by AAF.
• A Load Balancer or way to connect externally to your Kubernetes using the functional URL with SSL certificate.
Before you deploy the Helm template, clone it via git here:
git clone https://github.com/Australian-Imaging-Service/charts.git
then edit the following file:charts/releases/xnat/charts/xnat-web/values.yaml
And update the following entries underneath openid:
    preEstablishedRedirUri: "/openid-login"
      siteUrl: ""
      #List of providers that appear on the login page
      providers:
        aaf:
          accessTokenUri: https://central.aaf.edu.au/providers/op/token
          #accessTokenUri: https://central.test.aaf.edu.au/providers/op/token
          userAuthUri: https://central.aaf.edu.au/providers/op/authorize
          #userAuthUri: https://central.test.aaf.edu.au/providers/op/authorize
          clientId: ""
          clientSecret: ""
Comment out the Test or Production providers depending on which environment your XNAT will reside in. To use the example configuration from the previous configuration, the completed entries will look like this:
    preEstablishedRedirUri: "/openid-login"
      siteUrl: "https://xnat.example.com"
      #List of providers that appear on the login page
      providers:
        aaf:
          accessTokenUri: https://central.test.aaf.edu.au/providers/op/token
          userAuthUri: https://central.test.aaf.edu.au/providers/op/authorize
          clientId: "123jsdjd"
          clientSecret: "chahdkdfdhffkhf"
You can now deploy your Helm template by following the README here: https://github.com/Australian-Imaging-Service/charts In order for this to work, you will need to point your domain name and SSL certificate to the Kubernetes xnat-web pod, which is outside of the scope of this document.
Troubleshooting
Most of the above documentation should remove the need for troubleshooting but a few things to bear in mind.
All of the openid-provider.properties file and the values.yaml file mentioned above for either existing XNAT deployments are CASE SENSITIVE. The entries must match exactly AAF won’t work.
If you get a 400 error message when redirecting from XNAT to AAF like so:
The ClientId entry is wrong. This happened before when the properties file had ClientId like this:
openid.aaf.clientIDrather than:
openid.aaf.clientIdYou can see client_id section is empty. This wrongly capitalised entry results in the clientId not be passed to the URL to redirect and a 400 error message.
Check the log files. The most useful log file for error messages is the Tomcat localhost logfile. On RHEL based systems, this can be found here (example logfile):
/var/log/tomcat7/localhost.2021-08-08.logYou can also check the XNAT logfiles, mostly here (depending on where XNAT Home is on your system):
/data/xnat/home/logs
Feedback
Was this page helpful?
Glad to hear it! Please tell us how we can improve.
Sorry to hear that. Please tell us how we can improve.